Changelists
A changelist is a named group of uncommitted changes that you commit together. Changelists work at hunk level: two hunks of the same file can belong to different changelists and end up in different commits.
Example: while fixing a login bug you also correct a typo further down in the
same file. You put the bug fix into a changelist fix login and the typo into
typo, and commit them separately.
Every project has the default changelist Changes. It cannot be deleted.
The active changelist
New changes go into the active changelist. This applies to new hunks in tracked files and to new untracked files. Hunks you have moved explicitly stay where you put them.
The active changelist is shown in the top bar. To switch it, do one of the following:
- In the top bar, open the changelist menu and select a changelist.
- Choose Git › Switch Active Changelist….
- In the Git view, click the marker in the header of a changelist.
After you commit a changelist and it has no hunks left, Changes becomes the active changelist again.
Create a changelist
- In the top bar, open the changelist menu, or choose Git › New Changelist….
- Enter a name in the New changelist name field and confirm.
Names must be unique within the project.
Create a changelist from a projectdocs entry
A changelist can be linked to a projectdocs entry, for example a plan or a ticket. Commits made from this changelist are then recorded as belonging to the entry.
- In the projectdocs dashboard, right-click the entry.
- Choose Create Changelist from Entry.
The new changelist is named after the entry and becomes active. To find the entry for a commit later, right-click the commit in the history and choose Open Projectdocs Entry….
Move a hunk to another changelist
- In the editor, click the Git marker of the hunk in the gutter.
- In the peek window, click Move to….
- Under Move hunk to…, select the target changelist.
The label in the peek header, for example in: Changes, shows the changelist the hunk belongs to.

The hunk belongs to Changes. The menu lists the other changelists.
Move a file to another changelist
- In the Git view, right-click the file in the changelist panel.
- Under Move file to…, select the target changelist.
All hunks of the file move to the target changelist, also hunks that were in other changelists. To move a single hunk, use the gutter instead.
Rename or delete a changelist
In the top bar, open the changelist menu. Each changelist except Changes has two icons (the tooltip shows the name):
- Rename changelist opens a dialog with the current name. Enter the new name and click Rename.
- Delete changelist asks for confirmation and deletes the changelist.
When you delete a changelist, its files move to Changes. An empty changelist can also be deleted with the delete icon in its header in the Git view.
Stage and commit a changelist
Each changelist header in the Git view has two buttons:
| Button | Action |
|---|---|
| Stage | Stages all files of the changelist. |
| Commit… | Opens a commit form under the header. The message is prefilled with the changelist name, except for Changes. |
To commit a changelist:
- Click Commit… in its header.
- Edit the message.
- Click Commit n file(s). Press
Escto cancel.
The commit contains only the hunks of this changelist. Hunks of the same files in other changelists stay uncommitted.
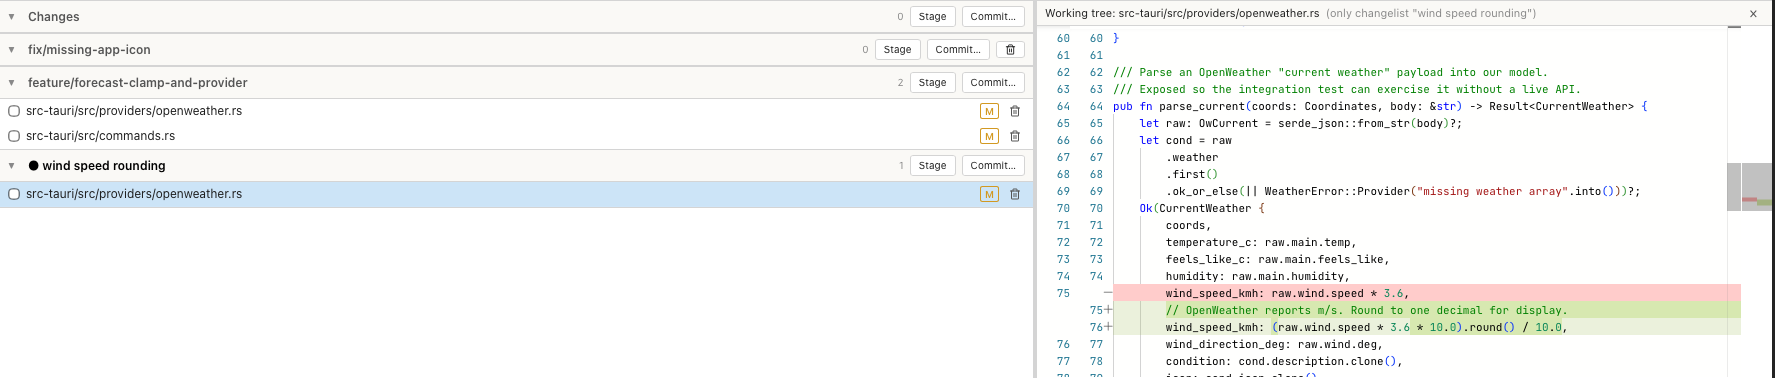
openweather.rs has hunks in two changelists and appears under both. The
diff shows only the hunks of wind speed rounding, the active changelist.
Changelists and the AI
The AI can read and organise changelists with these MCP tools:
| Tool | Action | Mode |
|---|---|---|
changelists_list | Lists changelists and their files. | all |
changelists_create | Creates a changelist, optionally active. | Brave |
changelists_set_active | Switches the active changelist. | Brave |
When the AI works on several tickets in one session, it can switch the active changelist per ticket, so that each ticket's changes end up in their own commit.