Signatures and audit trail
A profile can require an electronic signature when a spec is approved or
rejected. The GAMP 5 profile does (esignature: true), IEC 62304 does not.
The signature records who decided, when, with which meaning and reason, and
binds the decision to the spec body at that moment.
What a signature contains
The signature is written into the frontmatter of the spec as
approval_signature, also for a rejection:
approval_signature:
  body_hash: f74cfa230475758d6891b0ece9ca0996d96656c671ebac60770c96b48bb03b15
  meaning: approved
  method: password
  reason: Reviewed against TC-K4W4D2; caching behaviour matches the requirement.
  signer_id: dana.kim@example.com
  signer_name: Dana Kim
  signer_role: QA Lead
  ts: 2026-11-12T22:01:49.973142+00:00
ts is in UTC. body_hash is the hash of the spec body when it was signed.
With the SSH method the record also holds the signature itself
(signature, signature_format: sshsig, namespace: codeexplorer-spec) and
canonical_body_hash. The same record goes into the audit trail as an
artifact_signed event.
Signing methods
| Method | Secret | What the signature proves |
|---|---|---|
| Password (Argon2) | A signing passphrase. Its Argon2 hash is stored in the keychain of your user account. | That the body has not changed since signing (body_hash). Whether the person was who they claim cannot be checked on another machine. |
| SSH key (cryptographic) | The passphrase of your OpenSSH private key, by default ~/.ssh/id_ed25519, else ~/.ssh/id_rsa. | A cryptographic signature in the ssh-keygen -Y sign format. Every machine can verify it against your public key in specs/_signers.yaml. |
The SSH signature covers a normalised form of the body (line endings and
trailing whitespace do not matter), so a checkout on Windows does not break
it. The private key must be in OpenSSH format. Hardware keys (sk- keys) are
not supported. A key without passphrase works, but then the signature has no
secret component.
Set up signing
- Choose Analysis › Project Settings… and open the Signing tab.
- In Signing Method (project policy), choose Password (Argon2) or SSH key (cryptographic).
- Under Signer Identity, enter Unique ID (username / email), for example your git email, and Display name. Role (optional) is printed next to your name.
- For the SSH method, enter the path of your key in SSH private key (default ~/.ssh/id_ed25519) or click Browse….
- Click Save identity.
- For the password method, enter a passphrase under Signing Passphrase and click Set Passphrase. For the SSH method, click Register my public key.
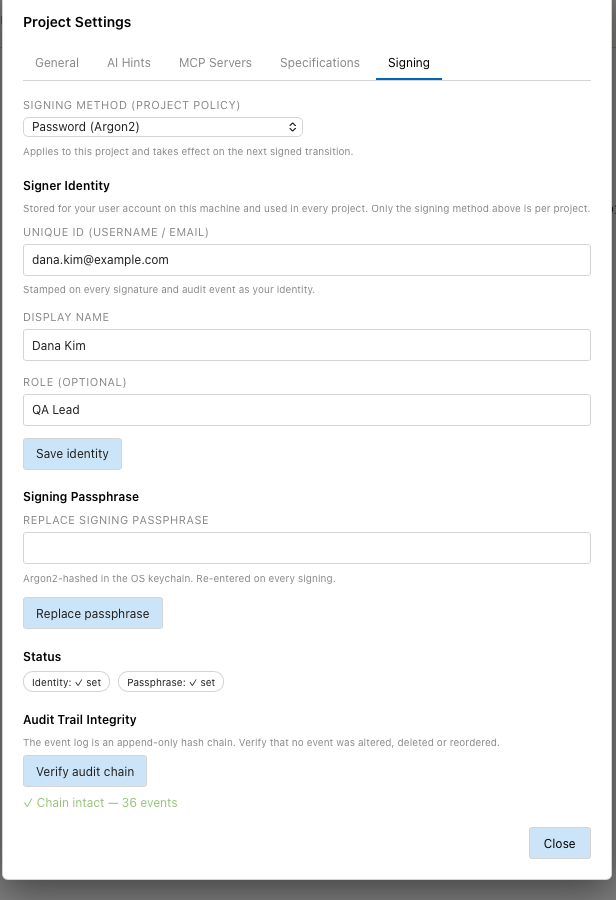
Status shows Identity: ✓ set and, for the password method,
Passphrase: ✓ set.
Register my public key writes your public key into
specs/_signers.yaml under your unique ID. Commit this file. Teammates verify
your signatures against it, and a new signer is added by committing their
entry.
The signer identity and the passphrase belong to your user account on this
machine and apply to every project. The signing method belongs to the
project. It is stored in the analysis database and is not shared through
git. After Analysis › Clear Cache & Re-analyze or on a fresh clone the
method falls back to esignature_method of the profile.
If you sign before setting up, the signature dialog asks for the identity and the passphrase first.
Change or reset the passphrase
To change the passphrase, enter the Current passphrase and the New passphrase in the Signing tab and click Change Passphrase. A wrong current passphrase counts towards the lock after five attempts.
Once a passphrase is set, changing the signer identity also needs it: the identity section of the Signing tab then shows a Current passphrase field above Save identity. Without this, anyone at the machine could rename the identity and sign under another name.
A forgotten passphrase cannot be recovered. Forgot Passphrase? Reset
Signing Identity… asks, then removes the signer identity and the passphrase
from this machine. Set up both again afterwards. Existing signatures stay
valid: they record the signer, the time, the reason and the hash of the spec
body, not the passphrase. The reset is written to the audit trail of the
open project as signer_reset, and the Signing tab shows when it
happened.
With the password method, anyone who can use your user account can also reset the identity. The protection is the login of the operating system.
Sign a spec
Prerequisite: the spec is in review.
- Select the spec in the Specs tab.
- Click Sign… next to the status menu, or choose
approvedorrejectedin the status menu. - In Reason, enter why you approve or reject.
- Enter the signing passphrase, or for the SSH method the passphrase of your key.
- Click Sign & approve or Sign & reject.
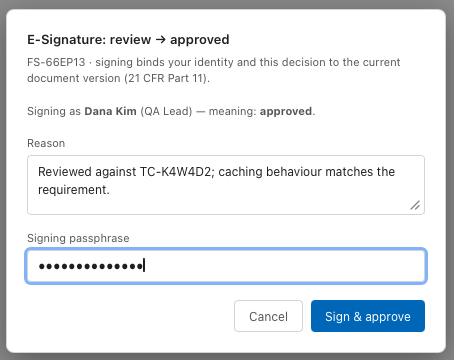
The passphrase is asked for every signature. After five wrong passphrases signing is locked. Restarting Tracemoor or a reset of the signing identity unlocks it.
To sign several specs at once, tick them in the artifact list, choose
→ approved or → rejected in the bar below the list and click Apply.
The dialog asks once and signs each spec with the same reason. See
Change the status of several specs.
Check a signature
A signed spec shows a strip below its title:

| Strip | Meaning |
|---|---|
| ✓ Signed | The signature is valid. With the password method: the body is unchanged since signing. |
| 🔒 cryptographically verified (SSH) | The SSH signature verifies against the public key in specs/_signers.yaml. |
| ✗ Signature invalid | The body changed after signing, or for SSH, the key is not registered or does not match. |
Verify checks again. The signature stays in the frontmatter when a spec
is reopened (approved → draft). Once its body changes, the strip shows
✗ Signature invalid until the spec is approved again.
The AI can check signatures with spec_verify_signature and
spec_signing_status. It can sign only with your passphrase. Do not give it
the passphrase; let it prepare an approval request that you sign. See
Specs and the AI.
Audit trail
The audit trail records every change to specs as an event: creation, edits, links, anchors, status changes, signatures, suspect raised and resolved, audit bundles created. Each event has a timestamp, an actor, a kind, the artifact, a payload and a hash.
The Audit tab of a spec lists its events:
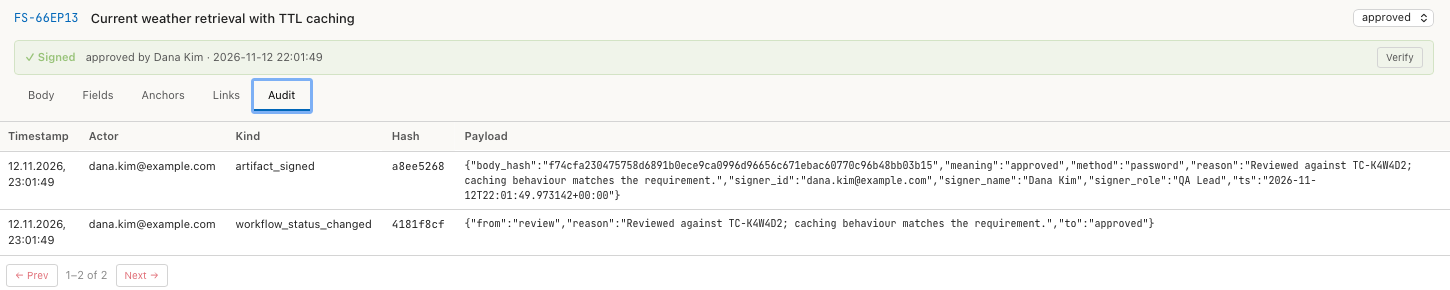
The actor is the signer for signed events. For other events it is the unique
ID of your signer identity, else your git email (git config user.email),
else user.
The events form a hash chain. Each event stores the hash of the previous one and its own hash over timestamp, actor, kind, payload and the previous hash:
this_hash = sha256(ts | actor | kind | payload | prev_hash)
A changed, deleted or reordered event breaks the chain from that point. To
check the chain, open Analysis › Project Settings…, tab Signing, and
click Verify audit chain. The result is ✓ Chain intact — N events or
✗ Chain broken at event #N with the kind of the event and the reason. The
AI tool spec_verify_audit_chain does the same.
Limits:
- The audit trail is stored in the analysis database of the exploration. It is not shared through git, and Analysis › Clear Cache & Re-analyze deletes it.
- Every machine keeps its own trail. Two people working on the same specs have two separate trails.
- Suspect events store the file path relative to the project. Events recorded before this change keep the absolute path of the machine that wrote them; rewriting them would break the chain.
An audit bundle contains the whole trail as
events.jsonl, with prev_hash on every line, so the chain can be checked
outside Tracemoor. Create and commit a bundle to keep the trail.